Wednesday, April 18, 2018

April Meeting CANCELLED!

Warning:  Tonight's meeting has been cancelled due to the snow storm.

It's hard to believe the calendar when you look out the window.
Let's just stay inside, keep warm, and quilt on!
I think I'll go to my happy place.
Messy, yes, but free of snow!
See you next month.


Sunday, March 18, 2018

March Pillowcase Madness


Last Friday and Saturday (March 16th and 17th), the sewing machines were humming away at Sew Many Pieces in Richfield.  You will definitely recognize most of these hard working ladies.  They are making pillowcases to donate for kids, for the APQ 1 Million Pillowcase Challenge.
Ironing and cutting have to happen before any sewing can begin.
Then there's the rolling and pinning to get the hem done right.
On to the machines!
These ladies put the pedal to the metal.
Not a great photo (sorry), sort of an action shot of the serger crew.  BTW, aren't these nice T shirts?
This was only the morning of the first day, so I'm sure there are many other volunteers not pictured.

Great job, one and all, generously donating space in the store (thanks, Mickey), organization, fabric, time and energy to help kids in need.  Quilters make it happen!


Monday, March 12, 2018

March Block of the Month--Sawtooth Stars

Hello, Ties that Bind Quilters!  Our block of the month for March is a 12 in. star, as seen above.
This star has lots of different names, like Sawtooth Star, Variable Star, etc., and it's one most quilters are probably familiar with.
Our color scheme for this block is red, white, and blue.  (USA!  USA!)
Start by cutting a center square, 6.5" x 6.5".
Next, cut 4 squares for the corners.  Each square will measure 3.5 in. x 3.5 in.   My background is dark and my star points are light, but you can reverse that if you like.

The only challenging thing about this block is making the 4 "flying geese" units, which make up the star points and the background.
There are LOTS of good ways to do this.
Here are some of your choices.

1.  Make 8 half square triangles with the star point fabric and the background fabric (above white and red), thus avoiding making flying geese units at all.  Your units will measure 3 in. square FINISHED.

2.  Use the sew and flip method, cutting one background rectangle and two squares of star point fabric.  Good directions are at:  Sawtooth at Marcia Hohn's Quilters Cache

3.  Use the "make 4 flying geese units at once" method, which you can find HERE.  There are directions for 4 different sizes of stars.

Or, you can use my method, which I outline below.  For this method, you need an Easy Angle ruler and a Companion Angle ruler, or similar rulers which do the same thing (Bonnie Hunter has one).

Easy Angle/Companion Angle Method
1.  Start with a 3.5 in. strip of light (for the star points) and a 3.5 in. strip of dark (for the background).
2.  Cut 8 light triangles from the 3.5 in. light strip, using the Easy Angle ruler.
 3.  Cut 4 dark triangles from the 3.5 in. dark strip, using the Companion Angle ruler.
All the triangles are cut.
4.  Sew the light triangles to one side of each of the dark triangles.  Press toward the LIGHT triangles.  (Yes, I'm serious.  You CAN press toward the light.  It works better this way with flying geese.)
FYI, pressing toward the light is not a sin.
5.  Now sew the light triangles on the opposite side, and press toward the LIGHT again. 
There, done.  No need to draw lines or stress out.

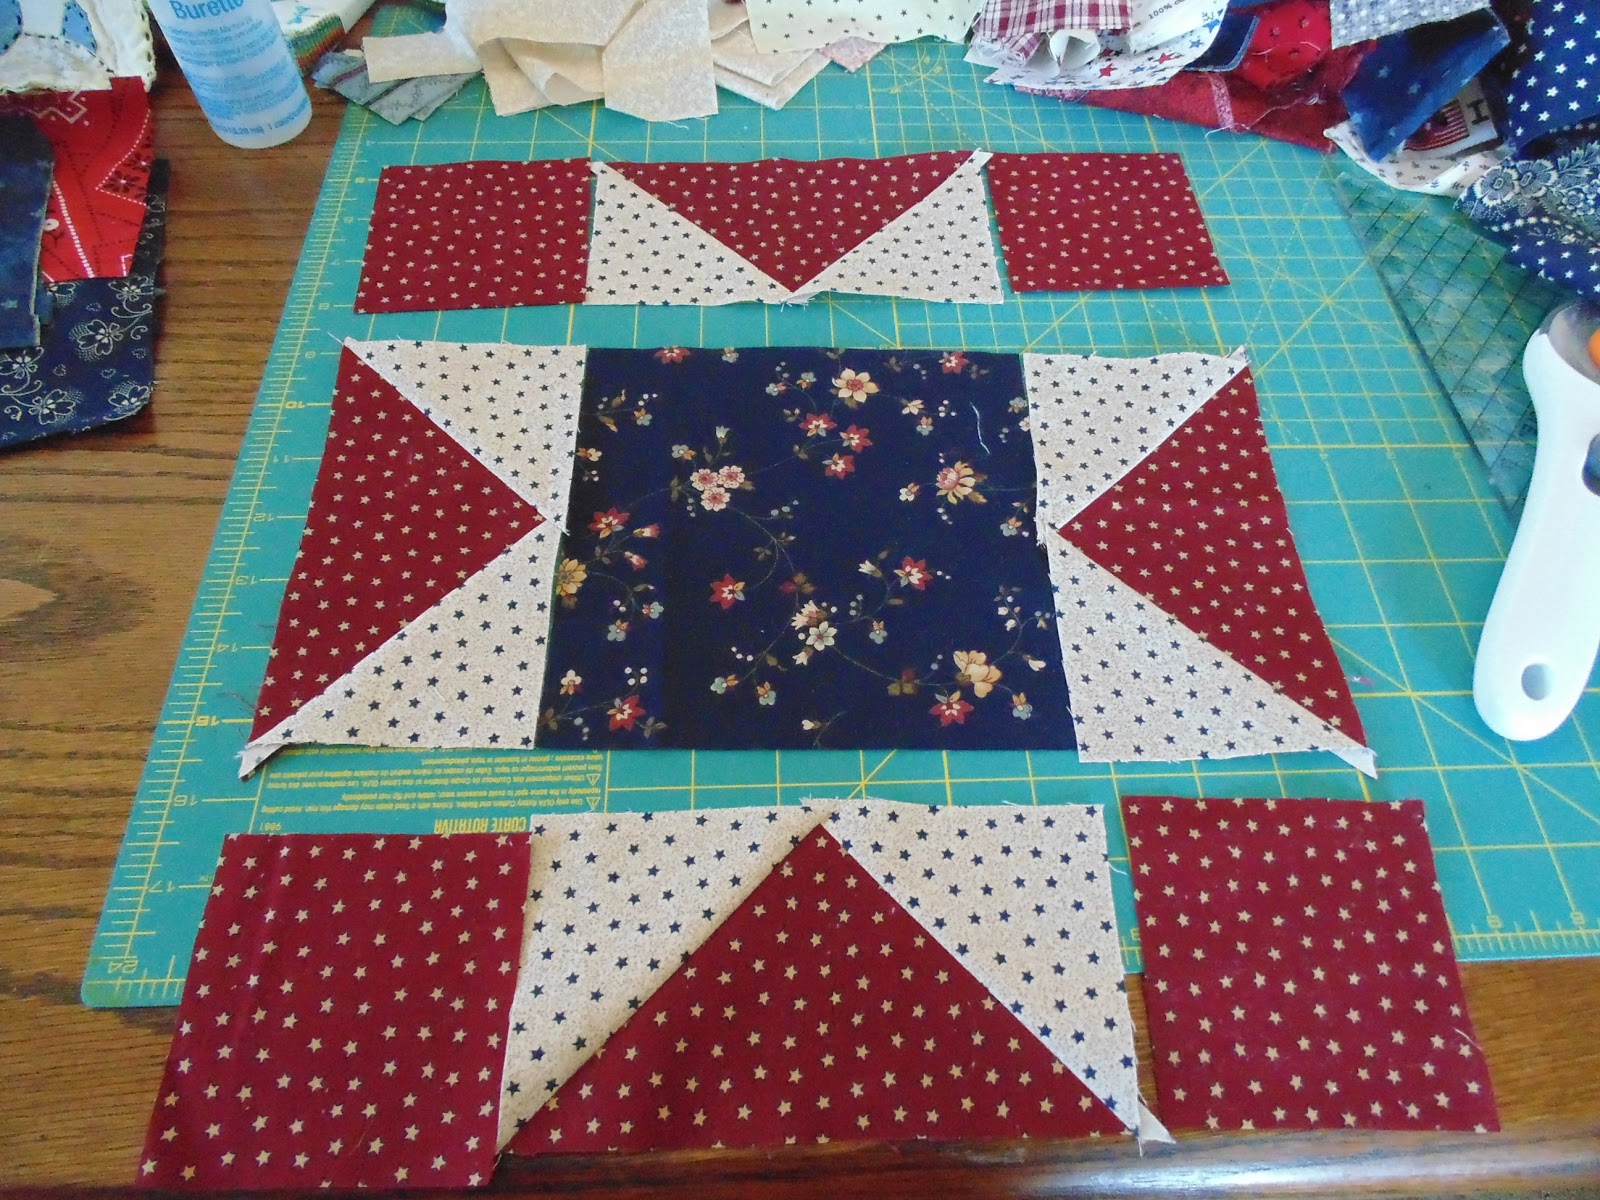
6.  To finish the block, lay it out like this:
Sew the rows together just like a nine patch, and finish the block.

And that's all there is to it!  Whatever method you use, you'll have a classic star block that looks good in any kind of fabric.


Here's Homework Puppy, to tell us what to bring for the March meeting.  Don't worry, it's all voluntary, no report cards or detentions will be given.

Block of the Month, as many as you care to make

2.5 in strips of 100% cotton fabric, selvedge to selvedge,  to trade, in groups of 20.

Food Pantry Cash or Grocery Cards, if you'd like to contribute.

Show and Tell

Christmas Shirt Blocks

Patriotic Blocks in either 12 in. or 6 in. finished sizes

Hey, we've got a lot going on!  Better wear your name tag!

See you on March 21st at 6:30 p.m.


Sunday, February 25, 2018

The 2018 Sleep-in-Your-Own-Bed Retreat

It's hard to believe that just a week ago we were still sewing madly at the retreat.  It was so much fun!
Above, Mary L. is showing us her T-shirt quilt, made with a new product that keeps the T-shirts stable during sewing and soft after washing.
The retreat was held in the (then) empty storefront next door to Sew Many Pieces in Richfield.
As you can see, we had lots of light pouring in from the front windows, and long tables for all our stuff.  Lorraine and company are hard at work here.  (Two out of three of these ladies are school librarians!)
Beautiful sewing was happening all through the room.  These ladies were working on a block of the month quilt.
Lovely batiks are being auditioned on this table with a machine appliqued block.
Here's our own Jean in the foreground, cutting and piecing.
Shelley made this baby quilt for a rapidly approaching baby shower.  She sewed the top, and Mickey took it next door and quilted it.  (How's that for service?)
Mary Z. was working on these gorgeous pink blocks.  (She did NOT want her picture taken.)
It did snow a little on Saturday evening, but not enough to stop Wisconsin quilters.
I didn't take a picture of the snack table, with all the goodies people brought, but it was PHENOMENAL.
Part of what I got done at the retreat were these two little doll quilts.  They are going to a lady in New Berlin who makes dolls for kids with differences (such as a missing limb, etc.).  The project is called A Doll Like Me, and you can read about it HERE
A quilt blogger has taken this on, and a fabric manufacturer has donated fabric bundles.  If you make a quilt by the end of the month you can get in on the drawing for a nice stack of fat quarters.  If that's too soon, don't worry, I'm sure she will continue to need doll quilts to go with the dolls.

I'll do a post in March with a tutorial for the Block of the Month, and reminders for the March meeting.
Until then, stay warm and keep sewing!


Sunday, February 11, 2018

February Meeting Notes and Block of the Month

First, I'd like to give a belated thank you to all the members who helped make the Christmas party so much fun.  There was wonderful food, the gift exchange, and even a visit from Santa and Mrs. Claus, who brought us these great mug organizers.  As you can see, I'm using mine to keep my favorite tools close at hand (and not buried under piles of scraps!).  Thanks to Nelly, Colleen, Mary, Joan, Nancy, and everybody else who helped create such a festive evening.  Your efforts are greatly appreciated.

This month's meeting data:
Next Meeting:  Wednesday, February 21st., 6:30 p.m. 
Don't forget we changed the time!!!
Pilgrim Lutheran Church
462 Meadowbrook Drive, West Bend, Wisconsin
All are welcome.

Special notes:  Bring any Valentine quilts, heart quilts, red and white quilts, etc. for show and tell.

Did you make the Christmas shirt block?  If so, please bring it (and tell me where I'm going wrong).

Block of the Month
Below is a tutorial for the Block of the Month.  If you are participating, please bring your blocks to the meeting.  You get one chance to win for each block you make!
This month's block is Buckeye Beauty, and will measure 12 in. square when finished.  We are making these blocks in fall colors.
 These are the directions that were handed out at the meeting, along with my cut pieces.
First, let's make the 4 patches.
1.  Cut 4 light squares, 3.5 in. x 3.5 in.
2.  Cut 4 assorted print squares, 3.5 in. x 3.5 in.
3.  Sew these squares into 4 patches, as above.  Each 4 patch will contain 2 light squares and 2 dark squares.  The 4 patches will measure 6.5 in. square at this point.
So far, not too hard, right?

Next, let's make the triangle squares.
1.  Cut a 6 7/8 in. square of light fabric. 
2.  Cut the 6 7/8 in. square of light fabric diagonally from corner to corner, making 2 triangles.
3.  Cut two 6 7/8 in. squares of darker fabric (mine are brown and green).  Then cut these squares diagonally from corner to corner.  You will have two extra triangles, one brown and one green (in my case---use whatever colors you like).  I used them to make a second block.
4.  Sew one light and one dark triangle together to make a square.  Do it again with the remaining light triangle and a different dark triangle.  These should measure 6.5 in. at this point.
Now, let's bring it home!
Arrange the sections like the photo above.  The dark squares should chain through the block from upper left to lower right, as shown.   The dark triangles should be on the outside of the block.

And that's all there is to it.  This block should measure 12.5 in. unfinished, and will measure 12 in. when sewn into a quilt.  (Maybe by YOU???)
You can also vary the light fabric you use, like so:
It just makes it a little scrappier.  BTW, the square in the upper left corner is actually red, not pink as it appears in this photo.
So that's Buckeye Beauty, a very versatile block that is great for using up scraps.

I hope to see you at the meeting.  We always have such a good time!
Until then, keep warm and keep quilting!


Sunday, January 7, 2018

Block of the Month Returns!

Happy New Year to all Ties that Bind members!

Next Meeting:  Wednesday, January 17th, 6:30 p.m.  OOPS!!! I almost forgot we changed the time!!!
Pilgrim Lutheran Church
462 Meadowbrook Drive, West Bend, Wisconsin
All are welcome.

We are starting Block of the Month again.  Here's the deal.  A block will be announced each month, and directions will be provided.  You can make one (or more) if you like.  For every block you make, you get one chance to win all of them.  The lucky winner's name will be drawn, and she will take home the blocks.  She will also bring a pattern the next month for a new Block of the Month.
Clear as mud?  Comment with questions and I'll answer if needed.

January's block of the month is Economy, kindly provided for us by Colleen.  Don't worry if you lost your directions.  You can follow this tutorial.

Block size:  9 in. finished
Colors:  fall colors

Cut:
1   5 in. square for the center
2   4.75 in. squares for the first round
2   6 in. squares for the second round
Subcut:
The center square stays the same.
Cut each of the other squares in half diagonally.  You now have 4 triangles of each.
 Now we're ready to sew.  These directions use 3 steps: sew-press-trim.
1.  Sew two opposite triangles to the center square.  Creasing the square in half and doing the same to the triangles makes it easier to match them up.
2.  Press the triangles away from the center square.
3. Trim the ends of the triangles even with the sides of the center square.
Now you're ready to add the other two brown triangles.
1.  Sew the triangles to the square.
2.  Press away from the center square.
3.  Trim this square, leaving a quarter inch at each point.  (My squares measured 6.75 in. after trimming.  I'm not sure if that's right.  Math!)

Okay, 4 triangles are on, now it's time to add the other 4.
1.  Sew triangles to opposite sides of the block.
2.  Press the triangles away from the center.
3.  Trim the ends of the triangles even with the block.
Then
1.  Sew the last two triangles onto the block.
2.  Press the seams away from the center of the block.
3.  Trim the block to 9.5 in., with the points a quarter inch from the edge.

I tried this 3 times, and none of them came out perfect.  As you can probably see, a couple of my outside points are more than a quarter inch from the edge.  But the block is 9.5 in. exactly.

So if you win these blocks, please forgive me for the floating points.
Let me know if anything in this tutorial is unclear or incorrect, and I'll fix it.

See you soon!